本文最后更新于 2025-05-10T18:15:20+08:00
并发与锁机制 实验概述 使用硬件支持的原子指令来实现自旋锁SpinLock => 可以用来实现线程互斥
ddl:5.18
实验任务: Assignment 1 代码复现题 1.1 代码复现 在本章中,我们已经实现了自旋锁和信号量机制。现在,同学们需要复现教程中的自旋锁和信号量的实现方法 ,分别 使用二者解决一个同步互斥问题,如消失的芝士汉堡问题。最后,将结果截图并说说你是怎么做的。
SpinLock复现 复现过程:
1
2
3
4
5
6
7
8
9
10
class SpinLock { void initialize () ;void lock () ;void unlock () ;
具体定义:
1 2 3 4 5 6 7 8 9 10 11 12 13 14 15 16 17 18 19 20 21 22 23 24 25 26 void SpinLock::initialize () 0 ;void SpinLock::lock () 1 ;do while (key);void SpinLock::unlock () 0 ;
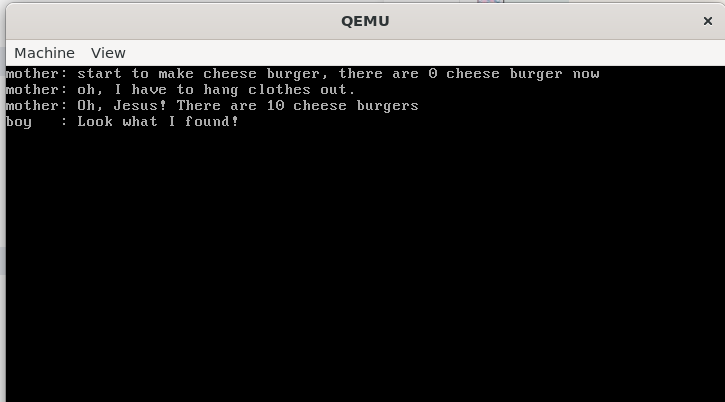
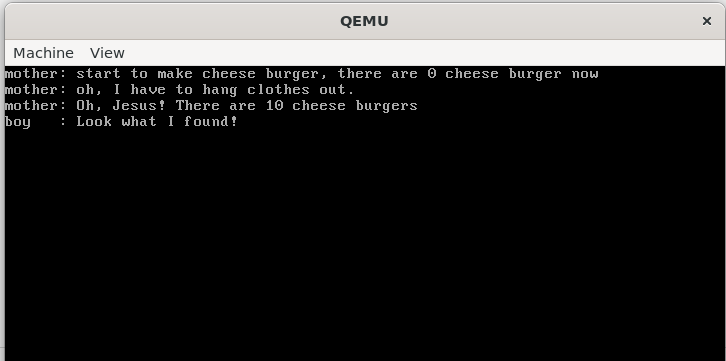
线程安排:可以看到在进入a_mother线程时上锁,保证 a_naughty_boy 线程无法同时访问临界区。然后在结束时再释放锁。
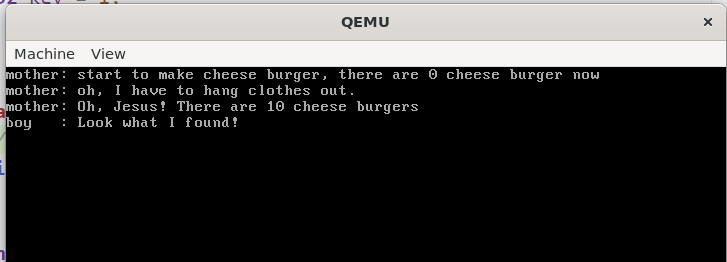
1
2
3
4
5
6
7
8
9
10
11
12
13
14
15
16
17
18
19
20
21
22
23
24
25
26
27
28
29
30
void a_mother (void *arg) int delay = 0 ;printf ("mother: start to make cheese burger, there are %d cheese burger now\n" , cheese_burger);10 ;printf ("mother: oh, I have to hang clothes out.\n" );0xfffffff ;while (delay)printf ("mother: Oh, Jesus! There are %d cheese burgers\n" , cheese_burger);void a_naughty_boy (void *arg) printf ("boy : Look what I found!\n" );10 ;
使用SpinLock复现结果:
信号量复现 首先声明信号量:
1
2
3
4
5
6
7
8
9
10
11
12
13
class Semaphore { void initialize (uint32 counter) ;void P () ;void V () ;
用counter来表示芝士汉堡的数量。调用P操作时会检查芝士汉堡数量是否足够,如果足够就会分配给请求的单元,如果不够就将请求这个资源的线程挂载到芝士汉堡信号量的阻塞队列中,直到有资源被释放,线程被唤醒。
调用V操作时会释放芝士汉堡资源,同时检查阻塞队列中是否有线程存在,如果有就去唤醒。
具体定义:
1 2 3 4 5 6 7 8 9 10 11 12 13 14 15 16 17 18 19 20 21 22 23 24 25 26 27 28 29 30 31 32 33 34 35 36 37 38 39 40 41 42 43 44 45 46 47 48 49 50 51 Semaphore::Semaphore()0 );void Semaphore::initialize (uint32 counter) void Semaphore::P () while (true )if (counter > 0 )return ;void Semaphore::V () if (waiting.size())else
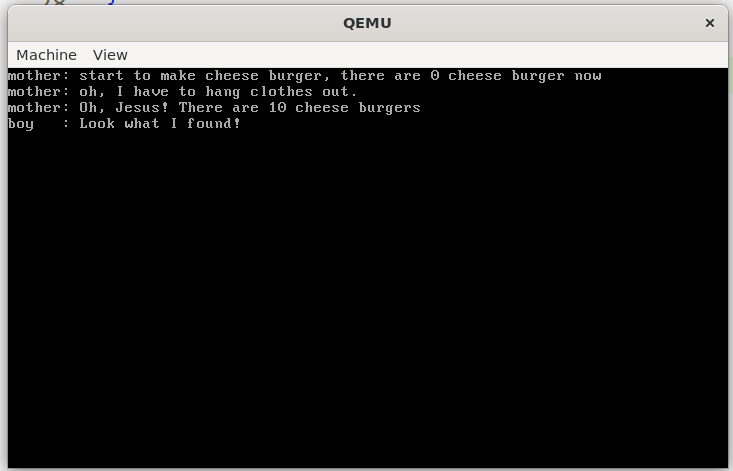
线程设置:可以看到mother线程在最开始的时候请求访问临界区,然后在执行完之后再释放资源,这样子调皮小孩就没办法同时访问临界资源了。
1
2
3
4
5
6
7
8
9
10
11
12
13
14
15
16
17
18
19
20
21
22
23
24
25
26
27
28
29
void a_mother (void *arg) int delay = 0 ;printf ("mother: start to make cheese burger, there are %d cheese burger now\n" , cheese_burger);10 ;printf ("mother: oh, I have to hang clothes out.\n" );0xfffffff ;while (delay)printf ("mother: Oh, Jesus! There are %d cheese burgers\n" , cheese_burger);void a_naughty_boy (void *arg) printf ("boy : Look what I found!\n" );10 ;
使用信号量复现运行结果:
1.2 锁机制的实现 我们使用了原子指令xchg来实现自旋锁。但是,这种方法并不是唯一的。例如,x86指令中提供了另外一个原子指令bts和lock前缀等,这些指令也可以用来实现锁机制。现在,同学们需要结合自己所学的知识,实现一个与本教程的实现方式不完全相同的锁机制。最后,测试你实现的锁机制,将结果截图并说说你是怎么做的。
提示:在asm_utils.asm中实现你自己的原子操作your_asm_atomic_exchange,并在sync.cpp中做相应修改。
BTS指令 :用于测试 并设置 指定位置的位值为1BTS dest,src
LOCK前缀 :指令前缀,用于在多处理器环境中以原子方式执行LOCK instruction
工作原理 :
当指令执行时,处理器会锁定系统总线或使用缓存一致性机制
防止其他处理器在当前指令完成前访问同一内存位置
确保指令的操作是原子的,不会被其他处理器的操作中断
适用指令 :只能用于某些特定指令,如ADD, ADC, AND, BTC, BTR, BTS, CMPXCHG, DEC, INC, NEG, NOT, OR, SBB, SUB, XOR等
1
2
3
4
5
6
7
8
9
10
11
12
13
14
15
16
17
18
19
20
21
22
23
24
25
26
; void my_asm_atomic_exchange(uint32 *register, uint32 *memeory);
执行结果:
Assignment 2 生产者-消费者问题 2.1 Race Condition 同学们可以任取一个生产者-消费者问题 ,然后在lab6的代码环境下创建多个线程 来模拟这个问题。在2.1中,我们不使用任何同步互斥的工具。因此,这些线程可能会产生冲突,进而无法产生我们预期的结果。同学们需要将这个产生错误的场景呈现出来 ,将结果截图并说说你是怎么做的。
1
2
3
4
5
6
7
8
9
10
11
12
13
14
15
16
17
18
19
20
21
22
23
24
25
26
27
28
29
30
31
32
var items = 0, space = 10, mutex = 1;
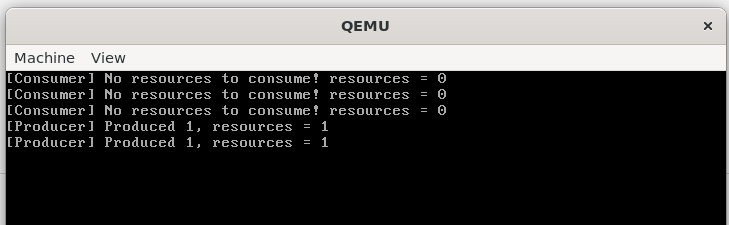
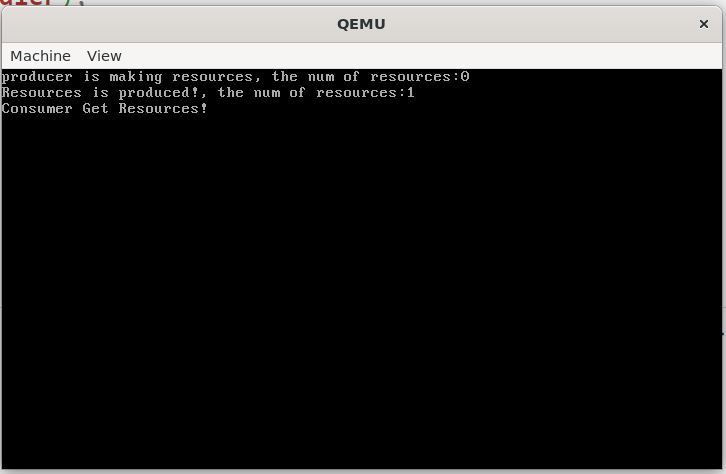
设计一个生产者消费者问题,假设有一个生产者和一个消费者,我们让生产者先生产一个资源,然后再消费者去获取资源。我发现在生产者把资源生产出来之前,消费者就去取了,还对外声称拿到了资源!
修改了一下:
1
2
3
4
5
6
7
8
9
10
11
12
13
14
15
16
17
18
19
20
21
22
23
24
25
26
27
28
29
30
31
32
33
34
35
36
37
38
39
40
41
42
43
44
45
46
47
48
49
50
51
52
void producer (void *arg) int delay = 0 ;int before = resources;0xfffffff ; while (delay--)1 ;printf ("[Producer] Produced 1, resources = %d\n" , resources);void consumer (void *arg) int delay = 0 ;if (resources <= 0 )printf ("[Consumer] No resources to consume! resources = %d\n" , resources);return ;int before = resources;0xfffffff ; while (delay--)1 ;printf ("[Consumer] Consumed 1, resources = %d\n" , resources);void first_thread (void *arg) 0 );for (int i = 0 ; i < 25 * 80 ; ++i)' ' );0 );0 ;"producer1" , 1 );"consumer1" , 1 );"consumer2" , 1 );"producer2" , 1 );"consumer3" , 1 );
2.2 信号量解决方法 使用信号量解决上述你模拟的生产者-消费者问题。将结果截图并说说你是怎么做的。
提示:
①经典的生产者-消费者问题有读者-写者问题、有界缓冲区问题等,可任取一个来模拟。
②模拟生产者-消费者问题的步骤:1、在代码中创建多个线程,分别代表生产者和消费者。2、编写生产者和消费者的线程函数。在这些函数中,根据问题的具体场景实现生产数据和消费数据的逻辑。3、创建并启动生产者和消费者线程。观察线程之间的交互并记录结果。4、展示没有使用同步互斥工具(如信号量)时,线程之间可能产生的冲突。5、使用信号量解决同步问题,并展示解决后的结果。
③样例视频模拟了读者-写者问题的场景:
1 2 3 4 5 6 7 8 9 10 11 12 13 14 executeThread (readFirstQuote, nullptr , "second thread" , 1 );executeThread (readSecondQuote, nullptr , "third thread" , 1 );executeThread (readThirdQuote, nullptr , "fourth thread" , 1 );executeThread (readFourthQuote, nullptr , "fifth thread" , 1 );executeThread (writeSecondQuote, nullptr , "sixth thread" , 1 );executeThread (writeFourthQuote, nullptr , "seventh thread" , 1 );executeThread (readSecondQuote, nullptr , "eighth thread" , 1 );executeThread (readFourthQuote, nullptr , "ninth thread" , 1 );
而使用信号量后,可以读到修改后的项。
使用信号量之后,生产者消费者问题得到了很好的解决
Assignment 3 哲学家就餐问题 假设有 5 个哲学家,他们的生活只是思考和吃饭。这些哲学家共用一个圆桌,每位都有一把椅子。在桌子中央有一碗米饭,在桌子上放着 5 根筷子。
当一位哲学家思考时,他与其他同事不交流。时而,他会感到饥饿,并试图拿起与他相近的两根筷子(筷子在他和他的左或右邻居之间)。一个哲学家一次只能拿起一根筷子。显然,他不能从其他哲学家手里拿走筷子。当一个饥饿的哲学家同时拥有两根筷子时,他就能吃。在吃完后,他会放下两根筷子,并开始思考。
3.1 初步解决方法 同学们需要在本教程的代码环境下,创建多个线程来模拟哲学家就餐的场景。然后,同学们需要结合信号量来实现理论课教材中给出的关于哲学家就餐问题的方法。最后,将结果截图并说说你是怎么做的。
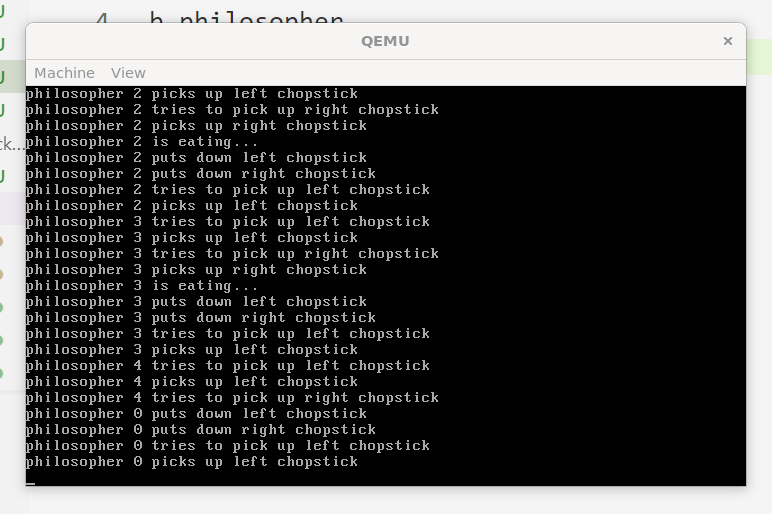
该方案可能导致死锁,请举例出现死锁的场景和原因,并提出一种解决死锁的方案。
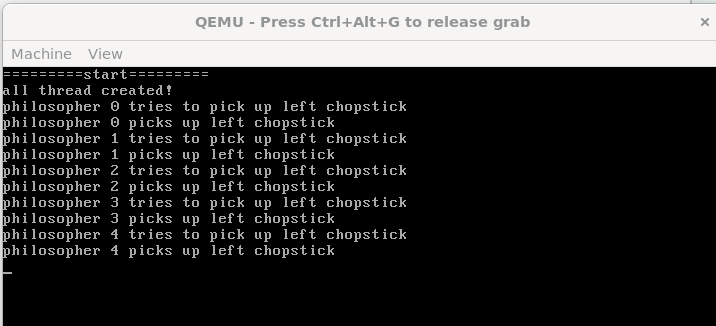
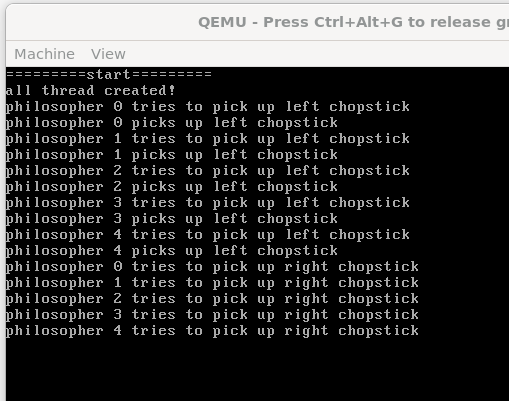
让我们来看一下运行情况:死锁 !
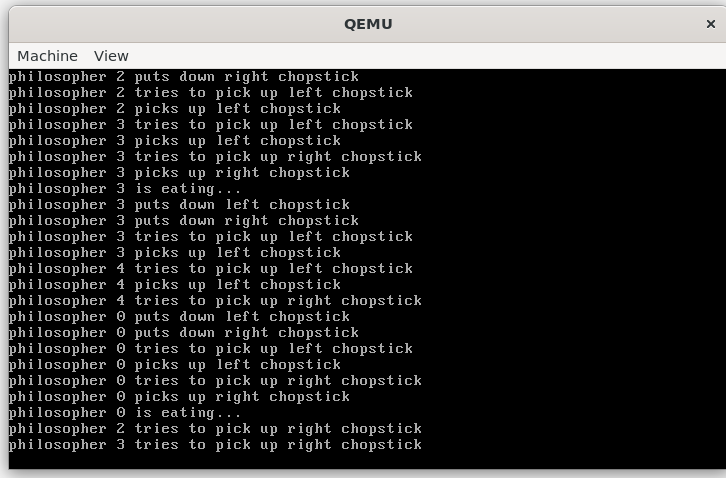
不出现死锁:
3.2 死锁解决方法(选做) 虽然3.1的解决方案保证两个邻居不能同时进食,但是它可能导致死锁。现在,同学们需要想办法将死锁的场景演示出来。提出一种解决死锁的方法并实现。最后,将结果截图并说说你是怎么做的。
说明:
①为演示死锁场景,可以在哲学家进食的线程中添加等待时间,使哲学家们的操作更接近于同时进行。
②样例视频演示了等待时间较少——正常、等待时间较长——出现死锁。
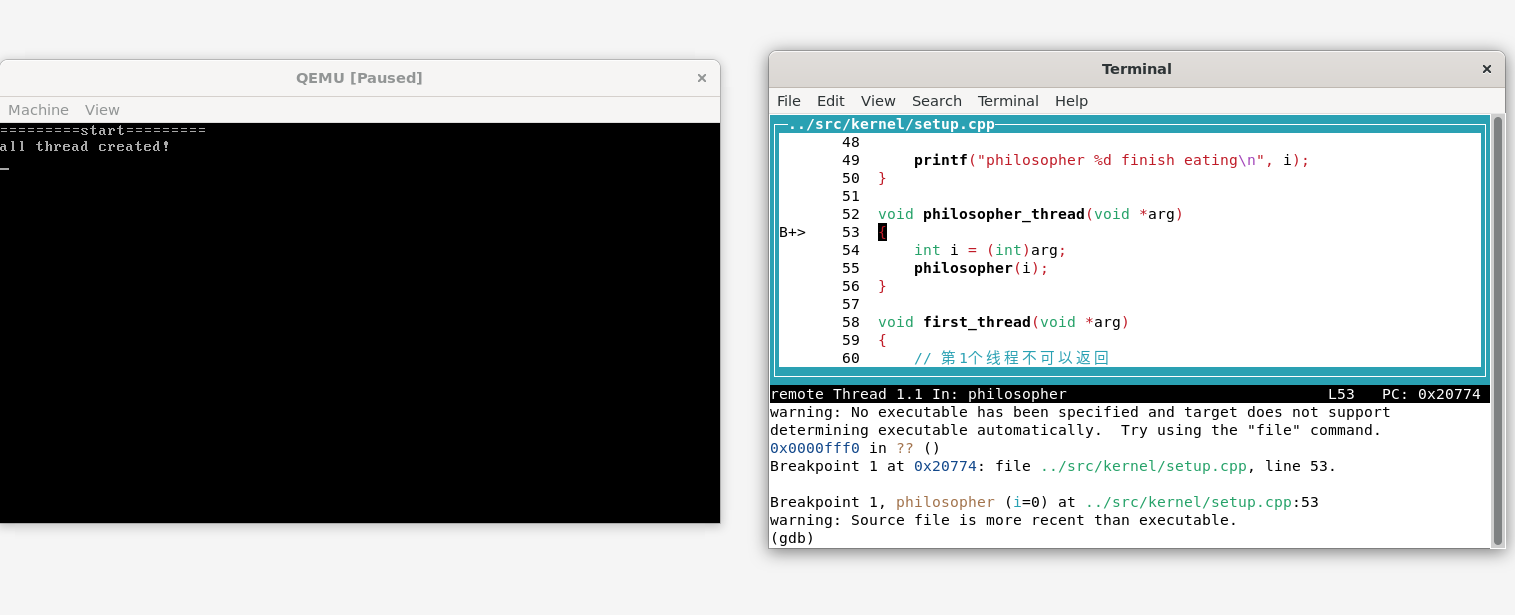
1
2
3
4
5
6
7
8
9
10
11
12
13
14
15
16
17
18
19
20
21
22
23
24
25
26
27
28
29
30
31
32
33
34
35
36
37
38
39
40
41
42
43
44
45
46
47
48
49
Semaphore semaphore[5 ];void philosopher (int i) int meals = 0 ; do printf ("philosopher %d is thinking\n" , i);printf ("philosopher %d tries to sit at the table\n" , i);printf ("philosopher %d sits at the table\n" , i);printf ("philosopher %d tries to pick up left chopstick\n" , i);printf ("philosopher %d picks up left chopstick\n" , i);int delay = 0x1FFFFFF ;while (delay) --delay;printf ("philosopher %d tries to pick up right chopstick\n" , i);1 ) % 5 ].P();printf ("philosopher %d picks up right chopstick\n" , i);printf ("philosopher %d is eating...\n" , i);0x3FFFFFF ;while (delay) --delay;printf ("philosopher %d puts down left chopstick\n" , i);1 ) % 5 ].V();printf ("philosopher %d puts down right chopstick\n" , i);printf ("philosopher %d leaves the table\n" , i);while (meals < 3 ); printf ("philosopher %d finish eating\n" , i);
知识学习 消失的芝士汉堡 1 2 3 4 5 6 7 8 9 10 11 12 13 14 15 16 17 18 19 20 21 22 23 24 25 26 27 28 29 30 31 32 33 34 35 36 37 38 39 40 41 42 43 void a_mother (void *arg) int delay = 0 ;printf ("mother: start to make cheese burger, there are %d cheese burger now\n" , cheese_burger);10 ;printf ("mother: oh, I have to hang clothes out.\n" );0xfffffff ;while (delay)printf ("mother: Oh, Jesus! There are %d cheese burgers\n" , cheese_burger);void a_naughty_boy (void *arg) printf ("boy : Look what I found!\n" );10 ;void first_thread (void *arg) 0 );for (int i = 0 ; i < 25 * 80 ; ++i)' ' );0 );0 ;"second thread" , 1 );"third thread" , 1 );
执行结果:
自旋锁 自旋锁的基本思想 是定义一个共享变量 bolt,bolt会被初始化为0。在线程进入临界区之前,即访问共享变量之前,都需要去检查bolt是否为0。
如果bolt为0,那么这个线程就会将bolt设置为1,然后进入临界区。待线程离开临界区后,线程会将bolt设置为0。
如果线程在检查bolt时,发现bolt为1,说明有其他线程在临界区中。此时这个线程就会一直在循环检查 bolt的值(类似陀螺在原地旋转,所以被称为自旋 ),直到bolt为0,然后进入临界区。(不过会导致忙等待)
实现自旋锁 1 2 3 4 5 6 7 8 9 10 class SpinLock { void initialize () ;void lock () ;void unlock () ;
常常将SpinLock定义为一个全局变量 ,而全局变量的构造函数在我们的操作系统实验中不会被自动调用,所以在使用 SpinLock 时需要手动调用 SpinLock::initialize
1 2 3 4 5 6 7 8 9 10 11 12 13 14 15 16 17 18 19 20 21 22 23 24 25 SpinLock::SpinLock()void SpinLock::initialize () 0 ;void SpinLock::lock () 1 ;do while (key);void SpinLock::unlock () 0 ;
lock():会不断检查是否能进入临界区,这里需要使用“原子”操作asm_atomic_exchange(&key, &bolt) 。但是实际上不是一个真正的原子指令,需要在某些条件下才是一个原子指令。
1
2
3
4
5
6
7
8
9
10
11
12
13
14
15
16
; void asm_atomic_exchange(uint32 *register, uint32 *memeory);
矛盾的根源就在于CPU提供的原子指令xchg的操作数要么是内存地址和寄存器 ,要么都是寄存器 ,而不存在两个操作数都是内存地址的情况
因此,我们在实现 asm_atomic_exchange 的时候作了一个重要的假设——形式参数register指向的变量不是一个共享变量
我们为芝士汉堡成功的上了锁,保证在执行完 a_mother 线程之后才会执行 a_naughty_boy 线程。
执行结果:
信号量 由于SpinLock存在如下的缺点:
定义一个非负整数counter表示邻接资源个数
请求资源,执行P操作:检查counter数量,如果有可用资源,则分配;如果没有则挂载到信号量的阻塞队列当中
释放资源,执行V操作:释放资源,同时检查挂载的阻塞队列中有没有线程,有则唤醒
counter和阻塞队列是共享变量,需要实现互斥访问=>使用SpinLock
信号量的定义:
1
2
3
4
5
6
7
8
9
10
11
12
13
class Semaphore { void initialize (uint32 counter) ;void P () ;void V () ;
P操作:
1
2
3
4
5
6
7
8
9
10
11
12
13
14
15
16
17
18
19
20
21
22
void Semaphore::P () while (true ) if (counter > 0 ) return ;
V操作:
1
2
3
4
5
6
7
8
9
10
11
12
13
14
15
16
void Semaphore::V () if (waiting.size()) else
实际上线程的唤醒有三种方式。
MESA模型 :阻塞队列中的阻塞线程被唤醒后,不会立即执行 而是放入到就绪队列 ,等待下一次的调度运行。而正在运行的线程会继续执行,直到程序执行完毕。Hasen 模型 :阻塞队列中的阻塞线程被唤醒后,会在当前线程执行完成后立即运行刚被唤醒的阻塞线程 。Hoare 模型 :阻塞队列中的阻塞线程被唤醒后,当前线程会立即中断 ,并运行刚刚被唤醒的阻塞线程 ,等阻塞线程完成再回来运行。